
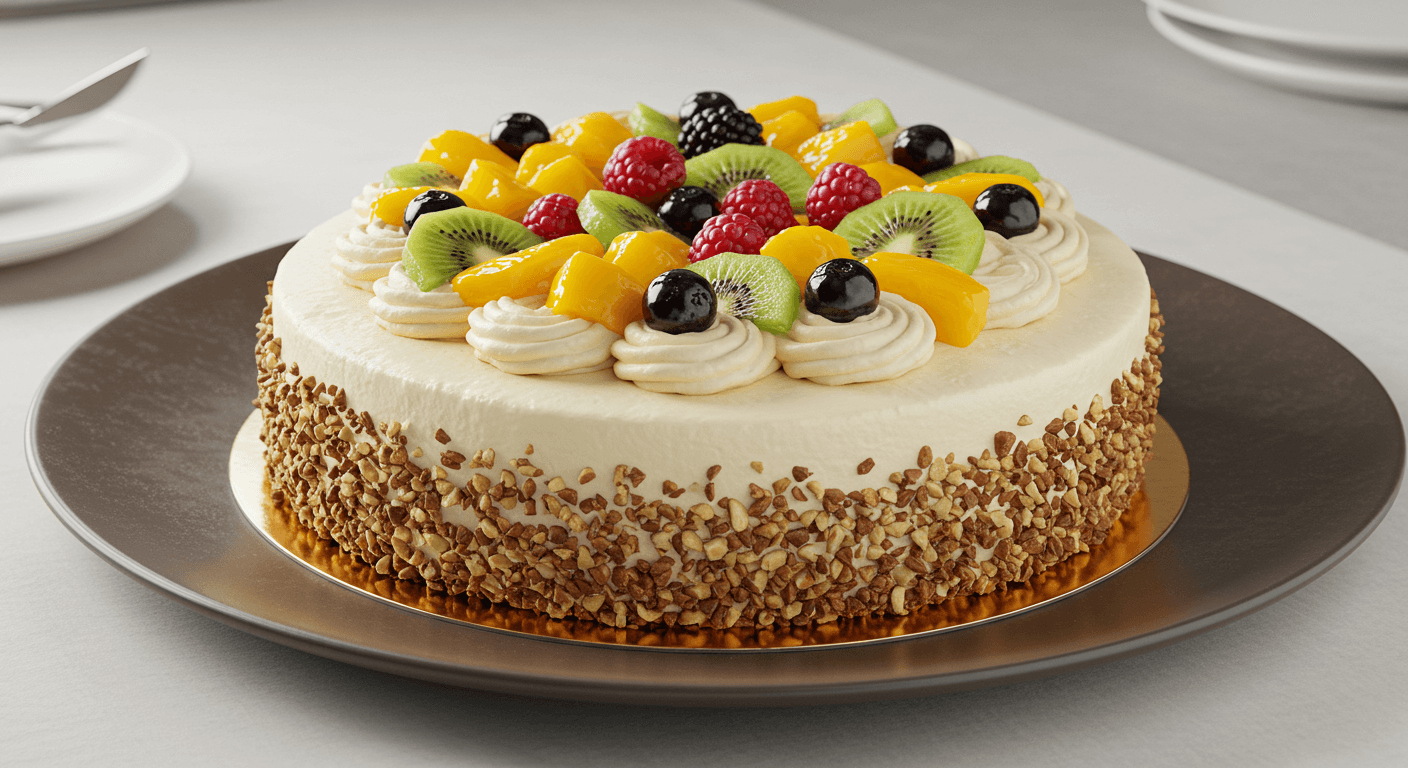
Who doesn’t love a cake that doubles as a showstopper? Picture this: your guests are gathered, chatting and laughing, when you walk in with a stunning cake on Platter that instantly steals the spotlight. Have you ever wondered how to create such an impressive dessert without spending hours in the kitchen? Today, I’ll show you just how easy it is to bake, assemble, and present a mind-blowing cake that’s as delicious as it is visually captivating. Whether hosting a birthday bash or simply wanting to surprise your family, this recipe will leave everyone marvelling at your skills. Let’s dive in and turn ordinary moments into extraordinary ones—with a slice of cake!
Key Benefits of Making a Cake on a Platter
Ever wondered how to make a dessert that feels both effortless and extraordinary? Your answer is a cake on the Platter—trust me, it’s easier than you think! Here’s why this recipe belongs in your baking arsenal:
- Impressive Presentation: Serving a cake on a platter adds elegance to any gathering. It’s not just about the taste—it’s about making a statement with your presentation.
- Customizable to Perfection: Whether craving chocolate decadence, fruity freshness, or something in between, this recipe lets you tailor flavours to suit your mood.
- Time-Saving Simplicity: There is no need for intricate layering or fancy tools—just a few simple steps to create a showstopping dessert that’ll amaze your guests.
- Perfect for Crowds: Need to feed a group without sacrificing quality? A platter-style cake ensures everyone gets their fair share of deliciousness.
Here’s a little secret: the best part isn’t just the taste—watching the smiles light up as people dig in. You can turn a humble cake into a true centrepiece by combining rich textures, vibrant toppings, and thoughtful arrangement. Ready to see how easy (and fun!) it is? Let’s dive into the ingredients—you won’t believe this magic’s simplicity!
Ingredients for Your Showstopping Cake on a Platter
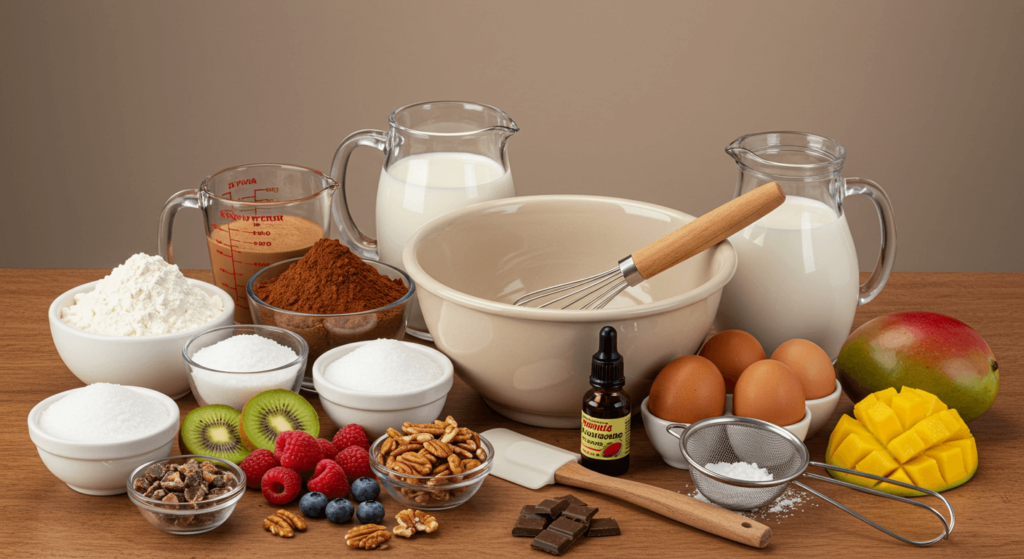
Before we dive into the magic of assembly, let’s gather our tools and ingredients. Think of this as the foundation for creating a mind-blowing dessert that will leave your guests in awe. Here’s what you’ll need:
For the Cake Layers:
- 2 cups all-purpose flour (sifted for a lighter texture)
- 1½ cups granulated sugar (adjust based on sweetness preference)
- ¾ cup unsweetened cocoa powder (for chocolate lovers!)
- 2 teaspoons baking powder (essential for fluffiness)
- 1 teaspoon baking soda (a must-have for perfect rise)
- 1 teaspoon salt (balances flavours beautifully)
- 1 cup whole milk (or buttermilk for extra richness)
- ½ cup vegetable oil (or melted butter for added indulgence)
- 2 large eggs (room temperature works best)
- 2 teaspoons vanilla extract (enhances aroma and flavour)
For the Frosting:
- 1 cup unsalted butter (softened to room temperature)
- 4 cups powdered sugar (sifted to avoid lumps)
- 2 tablespoons heavy cream (adjust for desired consistency)
- 1 teaspoon vanilla extract (never skip this!)
- Optional: food colouring or flavoured extracts (get creative!)
Toppings and Garnishes:
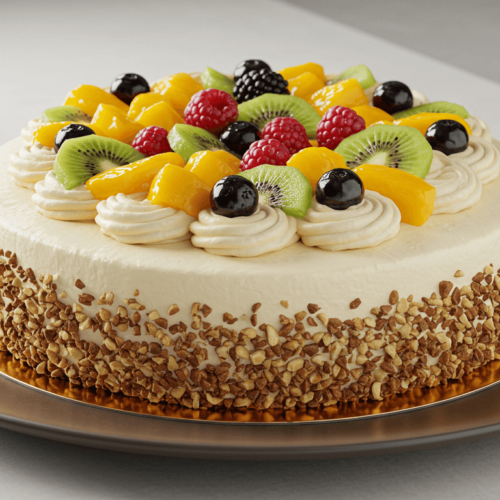
- Fresh fruits (berries, kiwis, mangoes—your choice!)
- Chopped nuts (almonds, pecans, or walnuts for crunch)
- Sprinkles or edible glitter (who doesn’t love a little sparkle?)
- Chocolate shavings or drizzle (rich and decadent touch)
Pro Tip:
Not everyone has time to bake from scratch—no judgment here! You can use high-quality boxed cake mix as a shortcut. Just enhance it with premium frosting and fresh toppings for that homemade feel.
Now that we’ve got everything ready, let’s move on to the exciting part: assembling your cake on a platter masterpiece. Stay tuned for step-by-step instructions that even beginners can follow with confidence. Happy baking!
How to Make Cake on a Platter: A Step-by-Step Guide
Now that you’ve gathered your ingredients and tools, it’s time to bring this masterpiece of cake on a platter to life! Follow these simple steps for a seamless baking experience:
1. Prepare Your Cake Layers
Start by baking your favourite cake recipe or using pre-made layers for convenience. Here’s what to keep in mind:
Ensure the cakes are fully cooled before assembling to prevent sogginess.
Level the tops with a serrated knife for an even surface, ensuring smooth stacking.
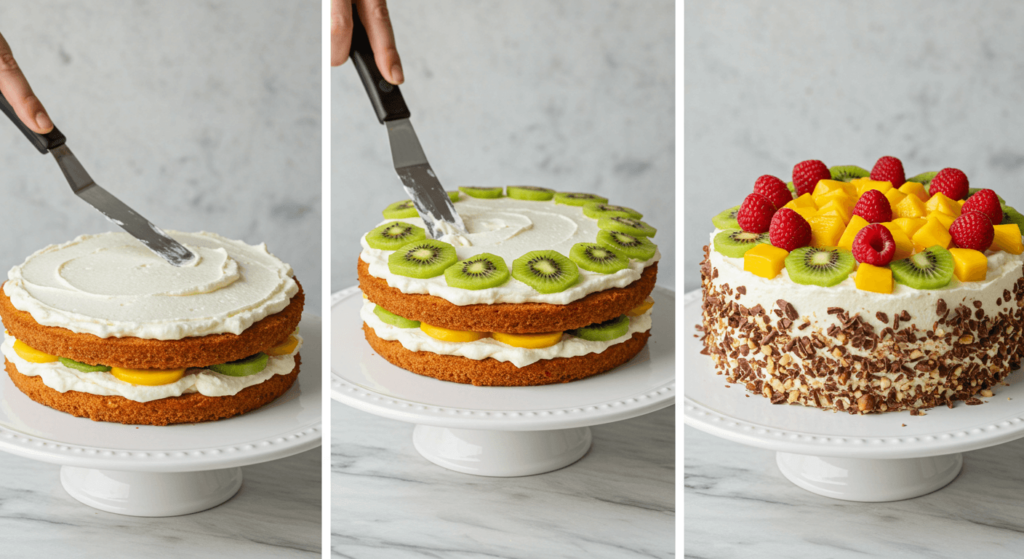
2. Assemble on the Platter
Choose a sturdy, flat platter design that complements your dessert. Follow these tips for effortless assembly:
Place a dollop of frosting on the Platter first to anchor the bottom layer.
Stack the layers, spreading a generous layer of frosting between each for added flavour and stability.
3. Frost and Smooth
This is where the magic happens! Use a spatula to apply a thin crumb coat, chill for 15 minutes, then add your final layer of frosting. Pro tip:
Dip your spatula in hot water and wipe clean between strokes for a flawless finish.
4. Decorate and Garnish
Let your creativity shine with these ideas:
Add fresh fruits, nuts, or sprinkles for a pop of colour and texture.
Drizzle chocolate or caramel sauce for an extra touch of indulgence.
5. Chill Before Serving
Chill the assembled cake in the refrigerator for at least 30 minutes to allow the frosting to set. This step ensures everything stays intact when slicing and serving.
And just like that, you’ve created a stunning cake on a platter that will impress! Remember, practice makes perfect, so don’t be afraid to experiment with flavours and designs. Happy baking!
Pro Tips and Variations for Your Cake on Platter
Now that you’ve mastered the basics, let’s take your cake on the Platter to the next level with expert tips and creative twists. These ideas will help you personalize your dessert while ensuring it remains a crowd-pleaser every time.
Expert Hacks for Flawless Results
- Smooth Frosting Technique: For an ultra-smooth finish, chill your cake layers briefly before applying frosting. This prevents crumbs from mixing in and gives you a professional look.
- Layer Assembly Secrets: Use toothpicks or dowels to stabilize taller layers if needed. It keeps everything neat and prevents sagging during transport.
- Garnish Like a Pro: Add fresh fruits, edible flowers, or chocolate shavings as finishing touches. Not only do they enhance flavour, but they also elevate the visual appeal of your platter design.
Flavor Pairings to Inspire You
Why stick to just one flavour when you can mix and match? Here are a few delicious combinations to try:
- Chocolate & Raspberry: Rich chocolate sponge paired with tangy raspberry filling—a classic combo that never disappoints.
- Vanilla & Caramel: Creamy vanilla buttercream meets gooey caramel drizzle for a sweet indulgence.
- Lemon & Blueberry: Zesty lemon curd layered with juicy blueberries for a refreshing twist.
Seasonal Variations for Every Occasion
- Springtime Charm: Incorporate pastel colours and floral decorations for a delicate touch perfect for Easter or Mother’s Day.
- Autumn Vibes: Swap traditional frostings for spiced apple or pumpkin flavours, then garnish with cinnamon dusting.
- Holiday Glamour: Go all out with red and green accents, peppermint candies, or a glossy chocolate ganache for Christmas celebrations.
Remember, the beauty of creating a cake on a platter lies in its versatility. Don’t be afraid to experiment with new ingredients or designs—baking is an art form! With these pro tips and variations, you’ll have endless ways to surprise and delight your loved ones.
Let’s move on to how you can serve this masterpiece in style…
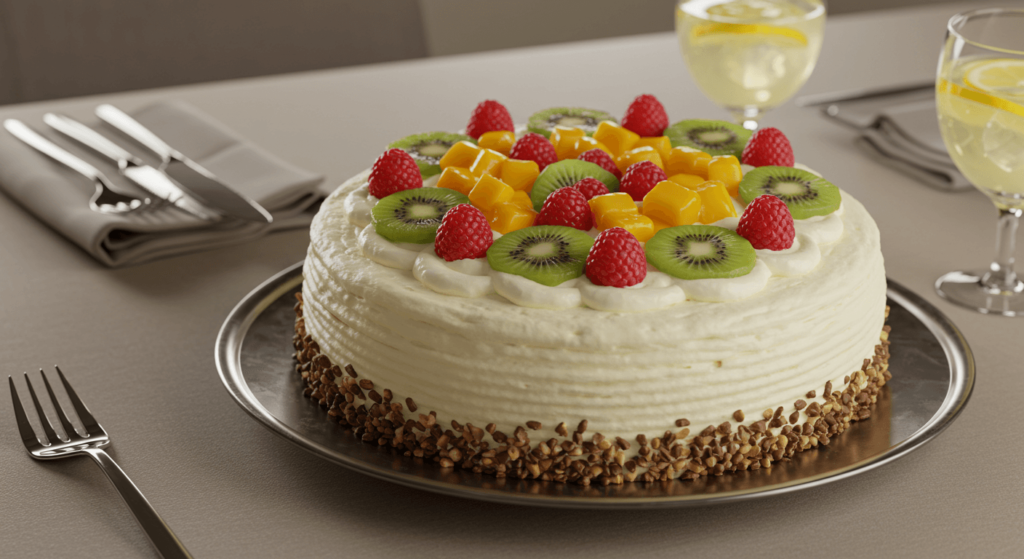
Serving Suggestions for Your Cake on a Platter
Now that your cake on the Platter is baked, assembled, and beautifully decorated, it’s time to think about how to serve it in a way that truly wows your guests. Here are some creative ideas to make the presentation as memorable as the taste:
1. Choose the Right Platter
Select a platter that complements your cake’s design. A sleek, rectangular platter works wonders for layered cakes, while a round one adds elegance for simpler designs. Don’t forget—your Platter is part of the overall aesthetic!
2. Add Garnishes for Extra Flair
- Fresh fruits like berries, kiwis, or mango slices add pops of colour and freshness.
- Crushed nuts or sprinkles bring texture and visual interest.
- Drizzle melted chocolate or caramel sauce for an extra touch of indulgence.
3. Pair with Complementary Beverages
Serve your cake alongside drinks that enhance its flavours:
- For rich chocolate cakes, pair with espresso or hot cocoa.
- Lighter sponge cakes go well with herbal teas or sparkling water.
- Want something festive? Try serving small glasses of prosecco or fruit-infused cocktails.
4. Create a Dessert Station
Please set up a mini dessert bar where guests can customize their slices. For an elegant touch, offer toppings like whipped cream, fresh mint leaves, or even edible flowers. This interactive approach keeps everyone engaged and excited.
5. Presentation Tips for Impact
- Place the Platter on a decorative stand or tray to elevate its presence.
- Use candles or fairy lights around the setup for a magical ambience.
- Arrange additional treats like cookies or macarons alongside the cake for variety.
Remember, the key to serving a successful cake on a platter lies in balancing flavour, presentation, and convenience. Following these tips will create an experience that leaves a lasting impression on your guests. Ready to serve up some happiness? Let’s do this!
Conclusion
Congratulations—you’ve now unlocked the secret to creating a cake on a platter that’s as impressive as delicious! Whether you’re a seasoned baker or just starting out, this recipe proves that stunning desserts don’t have to be complicated. Here’s a quick recap of why this treat deserves a place at your table:
- It’s effortless to assemble, saving you time while delivering maximum wow factor.
- The versatility allows you to customize flavours and designs for any occasion.
- Best of all, presenting it on a platter adds an element of elegance that guests won’t soon forget.
Remember, baking is about creativity and fun—so don’t hesitate to experiment with new ideas. Add fresh fruits, drizzle chocolate sauce, or add nuts for flair. Your personal touch will make each creation uniquely yours.
Now that you’ve got the tools and tips, it’s time to roll up your sleeves and start baking. Who knows? This may become your go-to dessert for every special occasion. Don’t forget to snap a picture and share your masterpiece online—you’ll inspire others to try this delightful recipe, too!
Ready to take your baking skills even further? Stay tuned for more easy yet showstopping recipes designed to impress. Happy baking, and here’s to turning ordinary moments into extraordinary ones—with cake!
cake on platter
Ingredients
- Ingredients
- All measurements are approximate and can be adjusted based on preference
For the Cake Base:
- 2 cups all-purpose flour or gluten-free flour for a gluten-free option
- 1½ cups granulated sugar
- ¾ cup unsweetened cocoa powder for chocolate cakes or omit for vanilla
- 2 teaspoons baking powder
- 1 teaspoon baking soda
- 1 teaspoon salt
- 1 cup whole milk or dairy-free milk alternative
- ½ cup vegetable oil or melted butter
- 2 large eggs
- 2 teaspoons vanilla extract
For the Frosting:
- 1 cup unsalted butter softened
- 4 cups powdered sugar sifted
- 2 tablespoons milk or heavy cream
- 1 teaspoon vanilla extract
- Optional: food coloring for added flair
For Garnishing & Platter Assembly:
- Fresh fruits berries, kiwi slices, mango chunks, etc.
- Chopped nuts almonds, pecans, or walnuts
- Chocolate shavings or drizzle
- Sprinkles or edible glitter for decoration
- A large serving platter with a flat surface
Instructions
Instructions
Step 1: Prepare the Cake Batter
- Preheat your oven to 350°F (175°C). Grease and flour two 8-inch round cake pans or one large rectangular pan.
- In a mixing bowl, whisk together the dry ingredients: flour, sugar, cocoa powder (if using), baking powder, baking soda, and salt.
- Add the wet ingredients: milk, oil, eggs, and vanilla extract. Mix until smooth and well combined.
Step 2: Bake the Cake Layers
- Pour the batter evenly into the prepared pans. Tap gently on the counter to release any air bubbles.
- Bake in the preheated oven for 25-30 minutes, or until a toothpick inserted comes out clean.
- Allow the cakes to cool in the pans for 10 minutes before transferring them to a wire rack to cool completely.
Step 3: Make the Frosting
- In a large mixing bowl, beat the softened butter until creamy. Gradually add the powdered sugar, alternating with spoonfuls of milk, until the frosting reaches your desired consistency.
- Stir in the vanilla extract and optional food coloring. Set aside.
Step 4: Assemble the Cake on Platter
- Place one cooled cake layer on the center of your serving platter. Spread a generous layer of frosting over the top.
- Stack the second cake layer on top and frost the entire cake generously. Use a spatula to smooth the frosting for an elegant finish.
- Decorate the frosted cake with fresh fruits, chopped nuts, chocolate shavings, and sprinkles as desired.
Step 5: Serve and Enjoy!
- Slice the cake into portions directly on the platter for easy serving. Pair with coffee, tea, or a glass of chilled milk for the perfect dessert experience.
Notes
Nutrition Information (Per Serving)
- Calories: 350 kcal
- Total Fat: 15g
- Saturated Fat: 8g
- Cholesterol: 60mg
- Sodium: 120mg
- Total Carbohydrates: 45g
- Dietary Fiber: 2g
- Sugar: 30g
- Protein: 5g
FAQ
Have questions about this delightful dessert? Here are some common queries (and answers) to help you feel confident every step of the way: